SkiaSharp: Hatched fills with SKShader
Coming from System.Drawing.Common, one of the things I missed most about SkiaSharp was the lack of support for hatched fills out of the box. If you’re unfamiliar, hatching allows you to paint with a pattern applied (source: ScottPlot 4.1 docs).
In SkiaSharp, you have two options:
If you want very simple results, SKPathEffect may be appropriate, but I would not recommend it for interactive or real-time rendering. SKShader isn’t much harder to implement, and SKPathEffect has significantly poorer performance, especially if the hatched area takes up large portions of the screen. The same zoom level could yield ~10 FPS with SKPathEffect, and ~300 FPS with shaders.
Additionally, SKPathEffect has some further drawbacks. If you draw a circle with SKPathEffect, the effect will bleed over significantly. And SKPathEffect will not tile up to the edges of the circle, yielding poor-looking results. These can be countered by clipping and shrinking the tiling unit respectively, but for my purposes it wasn’t worth it. Especially as reducing the size of each tile further exacerbates the performance problems. The rest of this post will be completely focused on SKShader.
SKShader
So, you’ve decided to use SKShader? Despite the name, it’s really not too hard to use, you don’t have to (and to my knowledge, cannot) write shaders from scratch in SkiaSharp. Instead, we’re going to create a small bitmap, and use SKShader.CreateBitmap to create a shader that tiles it across the fill.
For a striped hatch, the code to create the bitmap looks like this:
public static SKBitmap CreateBitmap(SKColor hatchColor, SKColor backgroundColor)
{
  var bitmap = new SKBitmap(20, 50);

  using var paint = new SKPaint() { Color = hatchColor };
  using var path = new SKPath();
  using var canvas = new SKCanvas(bitmap);

  canvas.Clear(backgroundColor);
  canvas.DrawRect(new SKRect(0, 0, 20, 20), paint);

  return bitmap;
}
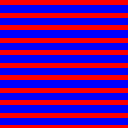
And the bitmap itself is simply CreateBitmap(SKColors.Red, SKColors.Blue):

Doesn’t look like much, does it? In any case, it’s enough to create a striped pattern. Now we have to create a shader:
public static SKShader GetShader(SKColor hatchColor, SKColor backgroundColor)
{
  return SKShader.CreateBitmap(
    CreateBitmap(hatchColor, backgroundColor),
    SKShaderTileMode.Repeat,
    SKShaderTileMode.Repeat,
    SKMatrix.CreateScale(0.25f, 0.25f));
}
Now, if we use this shader to paint a square:
var shader = GetShader(SKColors.Red, SKColors.Blue);
using var bmp = new SKBitmap(128, 128);
using var canvas = new SKCanvas(bmp);
using var paint = new SKPaint()
{
  Shader = shader
};

canvas.DrawRect(new(0, 0, 128, 128), paint);
WriteBitmapToFile(bmp, "hatch.png"); // This function is included in the github link at the bottom
Note that the 2nd and 3rd parameters set the tiling mode for the x and y directions respectively. In our case, we want it to repeat, but if you want it to mirror or clamp in one direction you can. Clamping in this context means displaying the image once and stretching the last pixel to the edge of the fill area.
The last parameter is for applying a transformation to the shader. For now, we just want to rescale it, but next we’ll use it for rotations.
Rotating the shader
Now, what if you want vertical or diagonal stripes? You could rotate the bitmap, but it’s simpler to rotate the shader. That way, you can reuse the same bitmap for different rotations.
Since the last parameter to SKShader.CreateBitmap was a transformation matrix, we can simply multiply by our desired rotation matrix to get what we want:
public static SKShader GetShader(SKColor hatchColor, SKColor backgroundColor, StripeDirection stripeDirection = StripeDirection.Horizontal)
{
  var rotationMatrix = stripeDirection switch
  {
    StripeDirection.DiagonalUp => SKMatrix.CreateRotationDegrees(-45),
    StripeDirection.DiagonalDown => SKMatrix.CreateRotationDegrees(45),
    StripeDirection.Horizontal => SKMatrix.Identity,
    StripeDirection.Vertical => SKMatrix.CreateRotationDegrees(90),
    _ => throw new NotImplementedException(nameof(StripeDirection))
  };

  return SKShader.CreateBitmap(
    CreateBitmap(hatchColor, backgroundColor),
    SKShaderTileMode.Repeat,
    SKShaderTileMode.Repeat,
    SKMatrix.CreateScale(0.25f, 0.25f)
      .PostConcat(rotationMatrix));
}
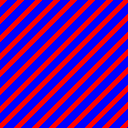
Now, if we call GetShader with StripeDirection.DiagonalUp, we get this result instead:
A quick note on the transformation matrix, when you call A.PostConcat(B) it represents this matrix multiplication A * B. These matrices represent a linear transformation, but matrix multiplication is not commutative, so the order matters. Unintuitively, the multiplication A * B corresponds to B(A(x)), not A(B(x)).
So while our code might look like it scales the shader followed by a rotation, it actually rotates and then scales. In this case, it doesn’t make a difference, but it’s worth noting in case you get up to anything more complicated.
Using a mask and colour filter
For most people’s purposes, this is as far as they need to go. But if you’re astute, you may have noticed that we baked the colours (in our case red and blue) into the bitmap. What if we need to be able to provide the same pattern with multiple colour palettes, do we have to regenerate the bitmap each time? Or do we have to write extra code to invalidate the bitmap should the colours change?
Instead, we can store the bitmaps as black and white, and then add the colour later. Then we can cache these bitmaps without ever needing to invalidate them. Seeing as they’re so small, you could even bundle them with your distribution, should you be so inclined.
This is covered in this post.
Links
-
Example code on github: https://github.com/bclehmann/SkiaSharpHatching
-
The pull request from which this code is based on: https://github.com/ScottPlot/ScottPlot/pull/2221